Home > Create Labels and Print Using Computer > Print Barcode Labels Using Crop Print (Windows) > Print Barcode Labels Using Crop Print (Windows)
Print Barcode Labels Using Crop Print (Windows)
Make sure your printer is connected to a computer or mobile device via a USB cable or network connection.
- Open the barcode document PDF file you want to print.
- Click .
- Click the Printer drop-down list, and then select your printer.
- In the Page Sizing & Handling section, select the Actual Size radio button.
- Under Orientation, select the Portrait radio button.
- Click Properties.
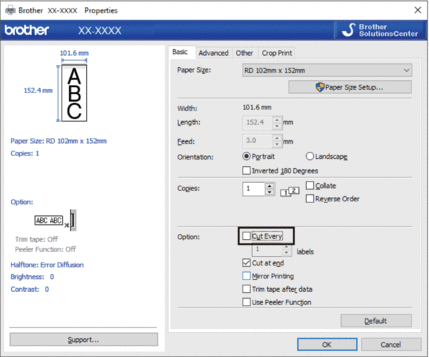
- Click the Basic tab, and do one of the following:
- For Die-cut labels, clear the Cut Every check box.
- For Continuous Rolls, select the Cut Every check box.

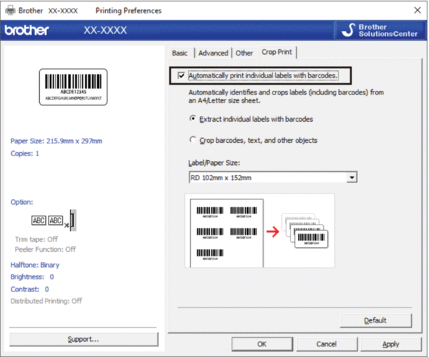
- Click the Crop Print tab, and select the Automatically print individual labels with barcodes. check box.

- Select the Extract individual labels with barcodes option for product labels or select the Crop barcodes, text, and other objects option for shipping labels.
- Click the Label/Paper Size drop-down list, and then select your label or paper size.If you select the Crop barcodes, text, and other objects option, only 102 mm width paper is listed.
 Select the closest label size to match the original size of the crop data. We recommend testing a sample before printing a large number of labels.
 - Click OK.
- Print from the application's print screen.

- Do not enlarge or reduce the size of the barcode sheet. The barcodes may not be identified correctly.
- When printing from Acrobat Reader, do the following:
- In the Page Sizing & Handling section, clear the Choose paper source by PDF page size check box.
- Under Orientation, select the Portrait radio button.
Did you find the information you needed?


