Home > Printer Settings > Change Printer Settings Using the Printer Setting Tool (Windows) > Paper Size Setup of Printer Setting Tool (Windows)
Paper Size Setup of Printer Setting Tool (Windows)
Use the Paper Size Setup in the Printer Setting Tool to add paper sizes not available in the Paper Size list of the printer driver.
Before you print using a paper size other than the available ones, you must register the new paper size by sending it to the printer.
Printing with a paper size not registered with the printer may produce incorrect print results.

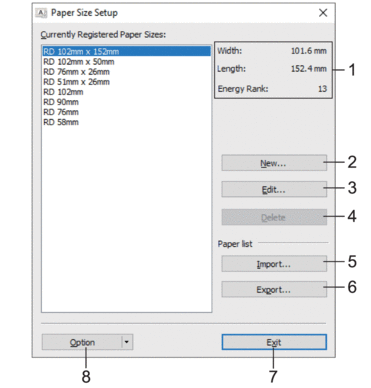
- Current settings
- Displays the current settings for the selected paper format.
- New
- Click this button to display the New dialog box and register a new paper size.
- NOTE
- Do not register a paper size already registered, to avoid incorrect print results. To use paper of the same size as one that is currently registered, select the size you want from the Currently Registered Paper Sizes list in the Paper Size Setup dialog box, and then change and overwrite the settings from the Edit dialog box.
- Edit
- Edits the settings for the selected paper format.
To save the selected paper format with the new settings, click Overwrite. To add a paper format with the new settings, change the name in the Paper Size Name box, and then click Add.
- Delete
- Deletes the selected paper format. A deleted paper format cannot be restored.
- Import
- Reads the text file containing the paper format settings and uses it to replace the contents of the Currently Registered Paper Sizes list.
- NOTE
- When the list is imported, the entire contents of the Currently Registered Paper Sizes list will be replaced with the imported paper formats.
- Export
- Exports the paper formats in the Currently Registered Paper Sizes list to a file. The exported formats can then be distributed to other computers.
- Exit
- Exits the Paper Size Setup window and returns to the main window of the Printer Setting Tool.
- Option
- Click
 , and then select an operation.
 Click Register Paper Size With Printer to register the settings for the selected paper format in the printer.
Click Save in Command File to export the paper settings as a command file. (The file extension is BIN.)
- NOTE
- When the paper format is registered with the printer and Exit is clicked, the Paper Size Setup dialog box appears with the added paper size in the Currently Registered Paper Sizes list. If the software is running, exit the software, and then restart it for the new paper format to appear in the list.
- If the following functions are being used, you can quickly apply their settings to the printer:
- Mass storage feature
- These commands are only intended to be used to apply settings to a printer. These commands cannot be imported into the Paper Size Setup.
New Dialog Box

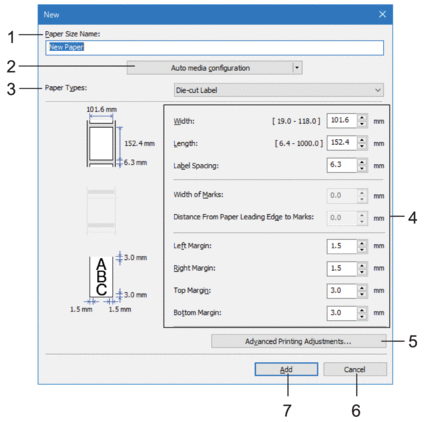
- Paper Size Name
- Type in the name of the paper format to be added.
- Auto media configuration
- Retrieves and displays the information of the paper set in the printer. For more information, see Related Information.
-
 Place the printer in idle when using this option. The printer may malfunction if you try to configure it while it is processing or printing a print job.
- Paper Types
- Select the paper type.
- Detailed settings
- Specify details for the paper format to be added.
- Advanced Printing Adjustments
- Click this button to display the Advanced Printing Adjustments dialog box and make advanced printing adjustments for each paper format.
- Cancel
- Cancels the settings and closes the dialog box. The settings will remain unchanged.
- Add
- Click this button to add the paper format and apply the settings.
Advanced Printing Adjustments Dialog Box

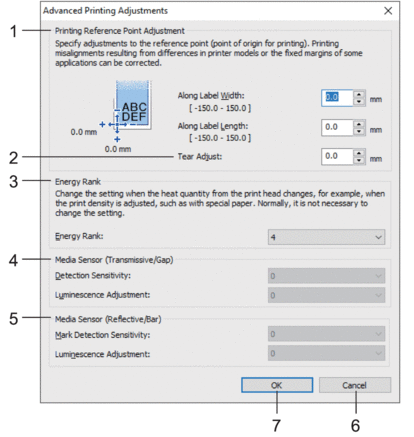
- Printing Reference Point Adjustment
- Adjust the position of the reference point (point of origin for printing). This corrects printing misalignments resulting from differences in printer models or from the fixed margins of some software.
- Tear Adjust
- Adjust the cutting position when the paper is cut using the Tear Bar.
- Energy Rank
- Adjust the amount of heat (energy) from the print head, for example, with special paper.
 There may be contrast variations in the print result due to the operating environment and media used. Modify the settings as necessary.
- Media Sensor (Transmissive/Gap)
- Adjust the precision with which the transmissive/gap sensor detects the gaps (spacing) for die-cut labels and the amount of light emitted by the sensor.
Settings can be specified when Paper Types is set to Die-cut Label.
 The settings for Media Sensor (Transmissive/Gap) in the Device Settings dialog box can influence the detection and calibration results. Make sure you specify the appropriate values.
Example settings:
Setting EX1 Setting EX2 Device Settings +2 -2 Paper Size Setup +2 +2 Actual effect 4 0
- Media Sensor (Reflective/Bar)
- Adjust the precision with which the reflective/black mark sensor detects black marks and the amount of light emitted by the sensor.
Settings can be specified when Paper Types is set to Media With Marks.
 The settings for Media Sensor (Reflective/Bar) in the Device Settings dialog box can influence the detection and calibration results. Make sure you specify the appropriate values.
Example settings:
Setting EX1 Setting EX2 Device Settings +2 -2 Paper Size Setup +2 +2 Actual effect 4 0
- Cancel
- Cancels the settings and closes the dialog box. The settings will remain unchanged.
- OK
- Saves the settings and returns to the previous dialog box.


