Home > Set Up Your Printer > Check the Sensor Position
Check the Sensor Position
When using RD or other types of rolls, you must check the sensor position based on the type of paper you are using. You can use other types of rolls in addition to the RD Rolls.
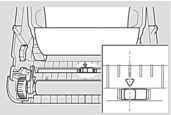
Die-cut Labels With No Black Mark
The transmissive/gap sensor detects the beginning of the label and feeds the label to the correct position.
- Align the slider with
 on the printer.
Die-cut Labels With Black Mark
The reflective/black mark sensor detects the mark and feeds the media to the correct position.
- Align the slider as shown in the illustration.
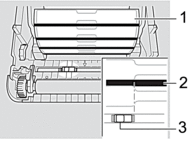
- Back of media
- Black mark
- Reflective/black mark sensor
Receipt Paper With No Black Mark
The reflective/black mark sensor detects if paper roll is finished.
- Align the slider with
 on the printer.
Media With a Black Mark
The reflective/black mark sensor detects the mark and feeds the media to the correct position.
- Align the slider with the centre of the black mark on the paper.
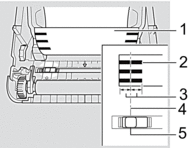
- Back of media
- Black mark
- 4 mm or more
Make sure there is at least 4 mm on the left and right of the centre of the black mark.
- Centre of the black mark
- Reflective/black mark sensor
 When using media with the maximum width of 118 mm, make a black mark at least 12 mm long in from either the left or right edge of the paper so that the reflective/black mark sensor can detect the black mark. If the black mark is too short, it cannot be detected by the reflective/black mark sensor.
Media With Holes
The reflective/black mark sensor detects the hole and feeds the media to the correct position.
- Align the slider as shown in the illustration.
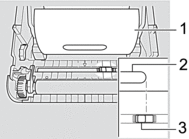
- Back of media
- Hole in media
- Reflective/black mark sensor
Wristband
The reflective/black mark sensor detects the mark and feeds the media to the correct position.
- Align the slider as shown in the illustration.
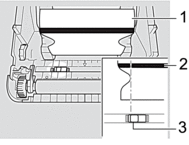
- Back of media
- Black mark
- Reflective/black mark sensor
Did you find the information you needed?


